Archives

Showing posts with label Blogging. Show all posts

[Google AdSense] How to setup your payment method using wire transfer to bank account (swift codes)


Following the announcement that Google Adsense will stop dispensing earnings through Western Union by early next year 2021, here's how you can update your payment details to use your local bank instead.


While check payment is still available as an option, I generally don't recommend it because as I've read, the check takes a while to reach your address, around 6 days compared to 2 days in wire transfer.

Until when can I use Western Union as a payment option?
No specific date but safe to say you have until end of this year 2020 to continue withdrawing using Western Union. But for your own sake, use a different payment method already hehe.

Related: How to claim your Google Adsense payment via Western Union in the Philippines 

Do I need to create a dollar account for this?
No need. Your local peso account can receive dollar payments. The bank will automatically convert the remittance to its peso equivalent using prevailing forex rates. 

But if you have an existing dollar account, you can also use that to avoid conversion loss. And if you feel like it will be beneficial to open up a dollar account, you may also do that. Just note that dollar accounts usually require $500 maintaining balance. Your choice hehe :)

How do I add a payment method using wire transfer?

The steps in adding a payment method is pretty straightforward once you login to your Google Adsense account:

  1. Go to Payments
  2. Manage payment method
  3. Add payment method
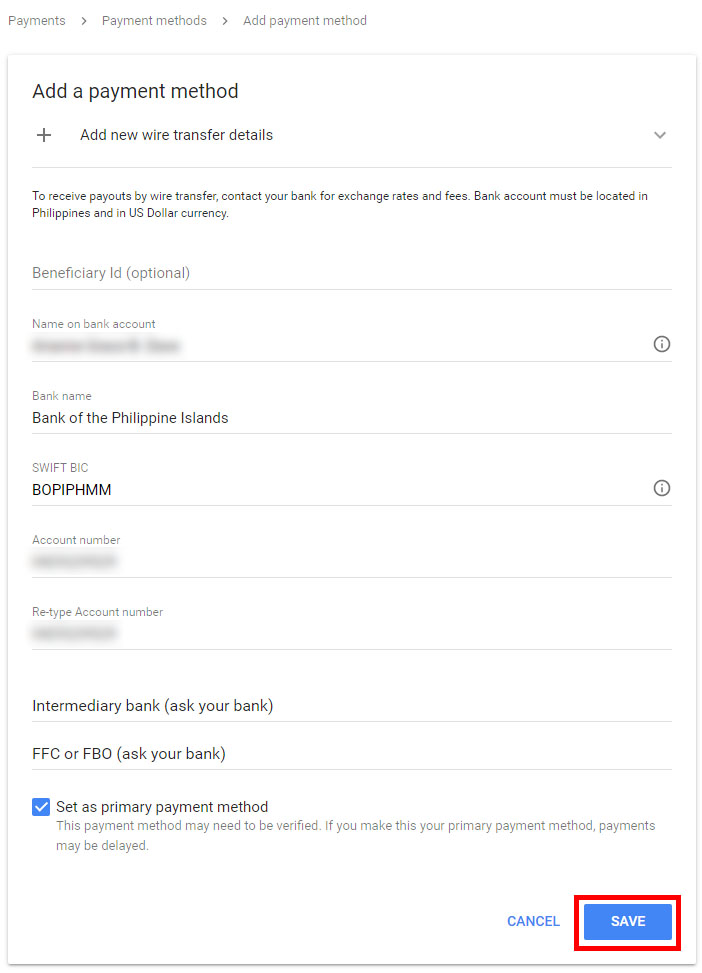
  4. Add new wire transfer details
For the details, you'll need the following:
  • Beneficiary ID - keep blank
  • Name on bank account - I submitted in this format: first name middle initial lastname (ie. Juan Gabriel A. Dela Cruz)
  • Bank name - I submitted the bank's full name (ie. Bank of the Philippine Islands)
  • SWIFT BIC - Refer to table below. For BPI it's BOPIPHMM
  • Account number - your account number, no dashes or spaces
  • Intermediary bank - keep blank
  • FFC or FBO - keep blank
Check 'Set as your primary payment method', click Save, and you're done.

Here's a sample:


For the Swift Codes, see table below. I've highlighted the most popular banks here in the Philippines. I personally added my BPI account as a payment method though I also have BDO and Union Bank. I got this list from grit.ph

BANK NAMESWIFT CODE
ASIA UNITED BANK CORPORATIONAUBKPHMM
AUSTRALIA AND NEW ZEALAND (ANZ) BANKING GROUP LIMITEDANZBPHMX
BANK OF COMMERCEPABIPHMM
BANK OF THE PHILIPPINE ISLANDS (BPI)BOPIPHMM
BANCO DE ORO (BDO) UNIBANKBNORPHMM
CHINA BANKING CORPORATION (CHINABANK)CHBKPHMM
CHINATRUST (PHILS.) COMMERCIAL BANK MANILACTCBPHMM
CITIBANK N.A. (CEBU BRANCH)CITIPHMXCBU
CITIBANK N.A. (MANILA HEAD OFFICE)CITIPHMXV
CITIBANK SAVINGS INC.CITIPH2X
DEVELOPMENT BANK OF THE PHILIPPINES (DBP)DBPHPHMM
EAST WEST BANKING CORPORATIONEWBCPHMM
HONGKONG AND SHANGHAI BANKING CORP. (HSBC) CEBU BRANCHHSBCPHMMCEB
HONGKONG AND SHANGHAI BANKING CORP. (HSBC) MANILA HEAD OFFICEHSBCPHMM
HSBC SAVINGS BANK (PHILIPPINES) INC.HBPHPHMM
LAND BANK OF THE PHILIPPINESTLBPPHMM
MAYBANK PHILIPPINES INCMBBEPHMM
METROPOLITAN BANK AND TRUST CO. (METROBANK)MBTCPHMM
PHILIPPINE BANK OF COMMUNICATIONS (PBCOM)CPHIPHMM
PHILIPPINE BUSINESS BANK (PBB)PPBUPHMM
PHILIPPINE NATIONAL BANK (PNB)PNBMPHMM
PHILIPPINE SAVINGS BANK (PS BANK)PHSBPHMM
PHILIPPINE VETERANS BANKPHVBPHMM
PHILTRUST BANK (PHILIPPINE TRUST COMPANY)PHTBPHMM
RIZAL COMMERCIAL BANKING CORPORATION (RCBC)RCBCPHMM
ROBINSONS BANK CORPORATIONROBPPHMQ
SECURITY BANK CORPORATIONSETCPHMM
STANDARD CHARTERED BANKSCBLPHMM
UNION BANK OF THE PHILIPPINESUBPHPHMM
UNITED COCONUT PLANTERS BANK (UCPB)UCPBPHMM

That's it. Hope this helps. :)
How to claim your Google Adsense payment via Western Union in the Philippines


WAAAAAHHH!!! For the first time in a gazillion years, I've reached threshold at Google Adsense! Hoorayyy! This is like a major highlight of my week hahaha so here's an account of how I cashed out my first Adsense earnings. Not much, just $100. But that freakin sum saved us from getting legally kicked in the ass by our creditors so yeah, thank God!

In summary, here are the steps to withdrawing your Adsense earnings:
  1. Get your payment receipt from your Google Adsense dashboard
  2. Go to Western Union or any Western Union agent (bring a valid ID)
  3. Request for a money transfer, then wait for your cash
It's that simple. But if you'd like more gibberish, carry on as I've prepared a boring narrative of the steps above. Make sure that your primary payment method is set to Western Union. You may also receive your Google Adsense earnings via check or bank deposit but I'm not sure about the fees. Receiving payments via Western Union is free, making it the most preferred withdrawal method in the Philippines - at least from what I've observed haha.

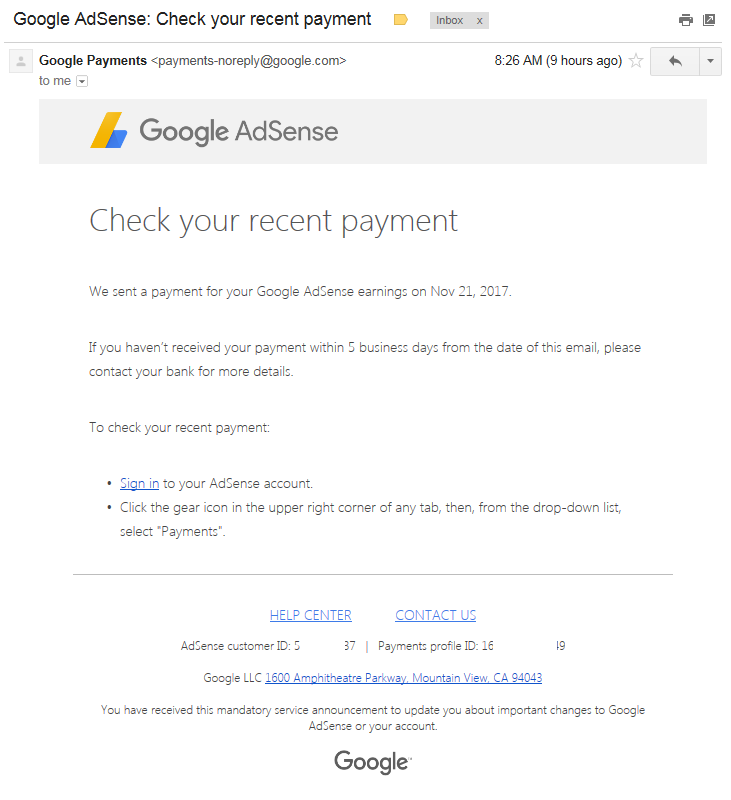
Okay. Note that Google Adsense issues payments every 21st of the month as soon as you've reached the $100 threshold. Then, you'll receive an email notification from Google Payments that your earnings have been processed. It's a sign that your payment is ready to be claimed. The email looks like this:


Find your payment receipt
Now let's find your payment receipt. It contains info you need to cash out at Western Union.

Login to your Adsense account and navigate to Settings, then Payments. Under the Transactions section, click on the most recent one.


Check the description, If the status reads ISSUED, then you're good! Click on the description to reveal your payment receipt.


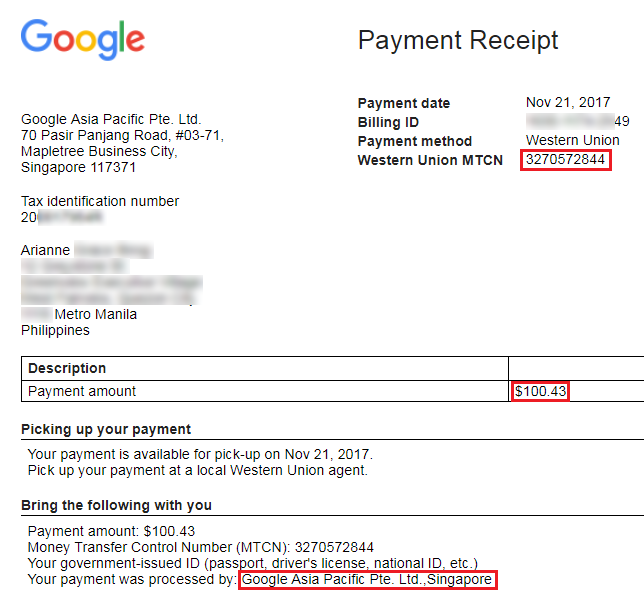
Here's how the payment receipt looks like:


I highlighted the important details in red. Or quite simply, just take note of the details at the bottom part, under Bring the following with you.

Go to Western Union or any accredited WU agent
You don't have to print the details, just make sure you have it with you because you need those in filling out the money transfer form.

Here's a WU agent locator to help you out: http://www.payment-solutions.com/agent.asp

In my case, I went to Sanry's Money Changer in Greenbelt 1, it has a Western Union outlet inside which is great because I can get my dollars from WU, then exchange it to peso via Sanry's. It's a two-step process but it's better because local money changers usually have higher exchange rates than WU. WU exchanges at ₱49 point something per dollar, whereas Sanry's offers ₱50.73 per dollar during that time. Also, you can ask WU to exchange your earnings directly to Sanry's so you only have to line up once. The two merchants share the same space and their counters are just adjacent to each other.

But of course it depends on you. WU can directly convert your earnings into peso if that's what you want. Just giving you options in case there's a money changer nearby! :)

Before I came to Sanry's, I actually inquired at Czarina Foreign Exchange first because it's nearer. Some money changers are authorized WU agents. Unfortunately their WU processing could take 30 minutes according to the staff because it has to be approved by the head office. I couldn't wait that long so I went to an actual WU outlet instead.

Finally,

Filling out the form
You'll be given a To Receive Money form which you should fill out using your personal details and the ones in your Payment Receipt. Don't forget to bring a valid ID. Here's a sample form I filled out. The personal details are made up for illustration purposes only.

  • Money Transfer Control Number (MTCN) can be found from your Payment Receipt.
  • Country of Origin refers to the Google office who processed your payment, in my case it's Singapore.
  • Amount expected should be exactly what it states in your payment receipt. I'm not sure if it's possible to cash out just a fraction of your earnings hehe. 
  • For Occupation/Nature of Business, I just put Advertising.
  • For the Sender relationship, just put Advertiser.
  • For the Sender name, I put the company name who sent my payment. That is, Google Asia Pacific Pte. Ltd.
That's it! Just wait for a couple of minutes and your money will be ready. :)

Hope this helps! And hopefully will get to reach threshold again soon. Hahaha.

How to integrate Mailmunch with Feedburner


I used to rely on Feedburner to deliver daily email digests to my subscribers. But their opt-in form is very limited in terms of design, and I couldn't find the right code to turn it into a popover that's responsive and non-invasive ('cos don't we all hate popups?).

Then I saw this pretty form from other blogs and immediately signed up to get one too.


I joined Mailmunch mainly because their form is pretty, responsive, and has flexible display options.

But just recently, I discovered that while I'm getting a bunch of email subscribers, I couldn't do anything with them. I couldn't send email blasts and updates. I can only stare at the list, and maybe manually add them to my Feedburner list. I wanted to sync the list to my Feedburner subscriber base so they could receive regular digests as well, but there is no straightforward option.

As of writing, Mailmunch doesn't have any option to integrate with Feedburner yet. But after googling about it, I stumbled upon this tutorial that shows you how to integrate the Feedburner opt-in form to the Mailmunch popover.

The result is successful!


Now, everyone who subscribes to this form will now be part of my Feedburner list. They will not appear in my Mailmunch list though, but they can finally receive blog updates to their email addresses. Yay!

If you want the same results, read on!

Prerequisites
1. Feedburner account with active Email Subscriptions
2. Mailmunch popover that is active on your blog/site
3. UNDERSTANDING that this is not an official integration, but more of a hack where you can use the Mailmunch popover to display your Feedburner opt-in form instead. In the future, we'd like the two to team up to provide this feature. But until that happens, this should serve as a good trick.

Steps
1. Login to Mailmunch and edit your form


2. Navigate to Fields and select Custom HTML under Choose Layout


3. Paste the following code into the HTML field, and make sure to replace YourFeedburnerID with... well, your Feedburner ID hehe

<form style="padding:3px;
             text-align:center;" 
      action="https://feedburner.google.com/fb/a/mailverify" 
      method="post" 
      target="popupwindow" 
      onsubmit="window.open('https://feedburner.google.com/fb/a/mailverify?uri=YourFeedburnerID', 'popupwindow', 'scrollbars=yes,width=550,height=520');return true">
  <input type="text" 
         style="display: block;
                border: 1px solid #ccc;
                color: rgba(0,0,0,0.75);
                font-size: 14px;
                font-weight: normal;
                font-family: inherit;
                padding: 8px;
                height: 37px;
                width: 100%;
                margin-top:-10px;
                margin-bottom: 15px;" 
         name="email" 
         placeholder="Enter your email"/>
  <input type="hidden" value="YourFeedburnerID" name="uri"/>
  <input type="hidden" name="loc" value="en_US"/>
  <input type="submit" 
         style="min-width: 30%;
                padding: 10px 20px;
                margin: 0 auto;
                border: 0;
                -moz-border-radius: 3px;
                -webkit-border-radius: 3px;
                border-radius: 3px;
                font-weight: normal;
                display: block;
                width: auto;
                height: 55px;
                font-size: 14px;
                text-align: center;
                max-width: 100%;
                overflow: hidden;
                text-overflow: ellipsis;
                color: #000000;
       background-color: #faae1e;"
         value="Subscribe" />
  <p style="font-size:12px; 
            color: #333;
            margin-top:10px;
            text-align:left">
    Delivered by <a href="https://feedburner.google.com" target="_blank">FeedBurner</a></br>
    Promise, no spam! You may unsubscribe anytime.
  </p>
</form>

<style type="text/css">
  .foot-note{
   display:none;
  }
  a:active, a:link{
   color:#d6464f;
   text-decoration: none;
  }
  a:hover{
   color: #368fe2;
  }
</style>

I have customized the code to reflect the original style of the Mailmunch opt-in form.

4. Save and publish, and you're done!


I hope this works for you as it did with me. If you have any questions, feel free to ask by commenting, I'll do my best to answer! :) If you want to see the form live: on the navigation bar above, hover on Follow, and click Subscribe, the form should appear. :D

Kick-start your Freelancing Career: Learn how to become a VApreneur

If you're always wondering about how online freelancing works, here's the right venue to learn about it!


This October 22, 2016, join us in a day of learning and discovery by attending #VApreneur: One Day To FREEdom! Workshop. This event aims to help aspiring and existing virtual assistants to develop their business, identify their core skills, meet more clients, and charge competitively for their services.

What is a virtual assistant and what does it have to do with freelancing? 
A virtual assistant or a VA is a person who provides services to a client remotely from home, may it be technical, creative, or administrative, it depends on what skills the VA has to offer. That said, VAs are freelancers too, offering services online and remotely to clients that are mostly overseas.

VA vs. VApreneur: the difference
The term VApreneur is a play between VA and entrepreneur, and was coined by Ms. Rochefel Rivera, one of the organizers and speakers of the event.

As a VA, you work as an independent contractor, providing services to your client, and is being paid a fixed rate or an hourly rate, depends on what is agreed upon. A VApreneur is more than that, your mindset is not just confined to a remote employee but a business owner, a service provider offering intangible products of high value to the clients. This shift from employee to entrepreneur mentality is what sets them apart, and is going to be tackled further during the event.

A lot of freelancers pride themselves as being their own bosses, but behind their desks they're slaves to their clients, overworked and underpaid. It's time to put more value to your work and package your services in a competitive manner, making your client see you as a partner and not just a cheaper alternative to a regular employee.

#VApreneur: One Day To FREEdom! Workshop
In this workshop, you will learn:
  1. How to transition from employee to VApreneur
  2. How to capitalize on your passion and existing skills while using the business model suited for your lifestyle
  3. Possible opportunities behind online entrepreneurship
  4. How to find clients that pay and appreciate the value of your work
  5. How to take advantage of technology and build your dream business from home

When: October 22, 2016 9:00AM
Where: Bluefin Grill, GF, Metrowalk Commercial Complex, Ugong, Pasig City
Ticket prices (snacks and lunch included)
  • Early bird rate until October 8: ₱888
  • Regular rate: ₱1,498
  • BFF rate: Learn with your BFF and get the 2nd ticket 50% off - ₱1,332
  • Gang rate: Gather a group of 4 and your pass is FREE - ₱2,664
For more information and ticket payments, head over to:
www.professionalvas-academy.com/vapreneur-road-tour-project/

:D

How to add a 'Back to Top' button on your blog with smooth scrolling (for Blogger)


This isn't something new, I picked this up from here and thought I should make a guide of my own specifically for Blogger users like myself.
Features:
  • 'Back to Top' button that fades into view at the bottom right corner of the page as you scroll down
  • Fades out when you reach the top
  • Smooth scrolling
  • HTML, CSS, JQuery, FontAwesome
Code:
Part 1: CSS

On Blogger >> Dashboard >> Template >> Edit HTML
Go to the CSS section of your blog and insert the code below:

.back-to-top {
    display:none;
    position: fixed;
    bottom: 2em;
    right: 10px;
    text-decoration: none;
    color: rgb(207, 72, 94);
    font-size: 12px;
    padding: 1em;
}

.back-to-top:hover {
    text-decoration:none;
    color: rgba(207, 72, 94, 0.8);
}

If you can't find where to put it, search for this ]]></b:skin> and paste the code above it.

You can edit the color and size of the button by changing the values in red and blue respectively. Unless you want a different hover color, keep the two RGB values the same. The alpha value (0.8) tells how transparent the button becomes when you hover on it.
Part 2: JQuery

Still inside the HTML code, paste the code below inside the <head> portion of your template

<script src="http://ajax.googleapis.com/ajax/libs/jquery/2.0.0/jquery.min.js"></script>

If it's already existing, no need to do this.

Part 3: HTML

Still inside the editor, paste the code below directly above the </body> tag.

<a href="#" class="back-to-top">Back to Top</a>
<script>
 jQuery(document).ready(function(){
  var offset = 220;
  var duration = 500;
  jQuery(window).scroll(function(){
   if (jQuery(this).scrollTop() > offset) {
    jQuery('.back-to-top').fadeIn(duration);
   } else {
    jQuery('.back-to-top').fadeOut(duration);
   }
  });

  jQuery('.back-to-top').click(function(event){
   event.preventDefault();
   jQuery('html, body').animate({scrollTop: 0}, duration);
   return false;
  })
 });
</script>

You may replace 'Back to Top' with any icon you want. In my case, I used an icon from FontAwesome and replaced the text in purple with this:

<i aria-hidden='true' class='fa fa-arrow-circle-up' style='font-size:50px'/>

Bonus: FontAwesome

It's basically a set of web fonts featuring scalable vector icons. In short, just a bunch of icons turned into fonts so you don't need to use an image every time you need one. Awesome!

To use FontAwesome, you must first install it like you did with JQuery by adding the line below inside the <head> portion of your template

<link href='https://maxcdn.bootstrapcdn.com/font-awesome/4.6.0/css/font-awesome.min.css' rel='stylesheet'/>

 Then choose the icon you want from here and get the corresponding markup in order to display it.
Done!
Save the HTML code of your blog and check to see if it works. :)

[FALSE ALARM] Broken images

Blogger has gone really bonkers lately. All of my uploaded images hosted under https://2.bp.blogspot.com cannot be displayed.

When I tried updating the images by using the same photo I uploaded, I noticed some of them have changed URLs. From 2.bp, I see some with 1.bp or 4.bp. I have no idea what happened since my photos were never moved. :/

I read around and was relieved to know this isn't an isolated case. It seems like blogger's image host 2.bp.blogspot.com is really down.

It's quite a bummer really.

ETA: False alarm goys, apparently, http://2.bp.blogspot.com was blocked by the company (for some reason). So much for my silly rants. Props to the Blogger Forum for helping me discover the real issue and to those who responded to my twitter rage charot haha.

I posted this topic on the forum and an expert answered me about how blogger images have multiple mirrors you can access just by changing the first digit.

Look, all of these URLs point to the same image

https://blogger.googleusercontent.com/img/b/R29vZ2xl/AVvXsEi-hzibNSHzceDoVzQFdNhmfwlPSzWwrC5K6aJpxRDWi_OrP2YHNwk-MKGT07NJ03xxmyOXKWTAJG2vGtpSVsna2Bj1tCa25iQSPxs3GPrcjhGBeRoB575s6FSRWqcWu_p-w5E441deV_Y/s1600/DSC_1111.JPG

Amaaaaazing thing I learned today! :D

5 reasons you should come to Nuffnang's Blogopolis 4D

In which I invite you to attend a blog and social media conference happening this Saturday! Why?


1. It's their cheapest Blogopolis yet!

Regular ticket price: ₱499 ONLY
Discounted rate: ₱349 (for students and senior citizens)

For the past installments they're usually around ₱1,000 so that's a huge mark down!

You don't really need to pay though. If you're masipag or just want to score free tickets, just look up "Blogopolis 4D ticket giveaway" on Google and join any of the (still open) contests, put in some effort and hope to win haha. The sponsors, speakers, even Nuffnang itself and its talent bloggers usually give out tickets to their readers. ;)

But really, 499 is already very cheap for an afternoon of learning (and celebrity spotting, susme).

2. Stellar hosts

Sam YG, Sam Oh, and IC Mendoza

The names are getting bigger and bigger, and should I say more and more? I'm betting on 4 hosts next year haha.

3. Esteemed speakers

Notable names are Vernon Sarne of Top Gear Philippines, Congresswoman Leni Robredo, Jonathan Yabut from The Apprentice, and Internet Superstar Ramon Bautista!

WHERE ARE YOUR TICKETS?!

4. Networking

If you're a blogger this is definitely a chance to meet-up with your blogger friends and extend your cards to sponsor exhibitors. Otherwise, you're still gonna meet new friends and learn a lot! Sosyalan ito guys, be ready with your OOTDs (char).

5. Freebies

I've never went home empty handed from any Nuffnang event (naks) so I'm sure you will too. HAHA Pero wag mag-demand ha. Poised tayo, poised.

That said, I hope I got you excited! I'm miles away so I won't be there but I'm sure it's gonna be fun and full of learning.

Teka, what's 4D ba?

Ewan ko rin LOL. You'll know when you get there! ;)

Blogopolis 4D
February 27, 2016 (Sunday)
Axon Hall, Green Sun, Makati City
www.blogopolis.ph

[Tutorial] How to rotate photos in Blogger

Let me tell you, there is no easy way to do this. I was hoping it will come as an update from Blogger but I got tired of waiting. It should be a basic feature when uploading photos, but oh well.

Anyway, here you go:

After uploading a photo and finding that it's rotated at the wrong angle...

1. Open Picasa web albums
You should know that all your photo uploads at blogger are deposited here.

2. Open your blog directory
It should contain all the photos you've uploaded. By default, your folder is named after your blog. If you can't find it, maybe you can "View All". It should be there hehe

3. Find the photo you want to rotate
Since it's a recent photo, it could be all the way down. To make it easier, sort the album by date. How? Click on "Organize", then on the "Sort photos by..." dropdown list, select "date (newest first)". Then click Done.

4. Open the photo and "Edit in Google+"
When you open the photo at Picasa you may find that the rotate left/right icons are disabled. God knows why! What you have to do is click on "Action" and select "Edit in Google+". It will load a new window where, THANK GOD, the rotate buttons are finally enabled!

5. Rotate and go back to blogger :D
It will be saved automatically. Now you can go back to your blog post, select "Insert Image" and look for the photo you've just rotated under the "From this blog" tab. It's probably all the way down, bummer, I don't think there's a sort by feature for this! XD

That should be all! Hope this helps! :D

WD partakes in Blogopolis 2015

WD participates in the country’s biggest blog and social media conference, Nuffnang Philippines’ Blogopolis 2015, held on February 21, 2015 at the Dusit Thani Hotel, Makati City.

Dubbed as “Shifting Gears”, the Blogopolis event is poised to gather people from different walks of life with varied hobbies and interests as they get inspiration in the blogosphere and updates about online trends from the country’s most influential bloggers and media personalities.

WD is supporting this annual event by showcasing its latest product portfolio, offering product consultation and photo booth opportunities. WD is also giving away freebies and merchandise to visitors of WD booth.

Blogging with WD

Blogging is all about sharing anything under the sun to your readers, be it your personal experience or random fun at your professional atmosphere, or any other exciting topics you deem important to be documented and shared. Be it fashion, travel, fitness, entertainment or sports, your blog posts are sure to be more exciting with captivating photos and amazing videos!

For fashion bloggers

For those bloggers who have passion for fashion and would not last a day without capturing their stunning Outfit Of The Day or OOTDs, WD’s My Passport Wireless is the best choice! One may store photos in this handy and fashionable hard drive without the hassle of cords.

WD My Passport Wireless prices:
 1 TB starts at Php 9,590
2 TB starts at Php 11,990

For tech bloggers

Gamers and techie people will never let their files go constrained. That is why WD has designed hard drives that are worthy of this rule! With its WD Red 5TB (model #: WD50EFRX), you have the convenience to store your always updating files!

WD Red prices:
5TB is priced at Php 10,950,
6 TB (model #: WD60EFRX) is priced at Php 13,400.

WD Red takes pride in its network attached storage (NAS) system. For other options, WD Red Pro boasts of its 16-bay high capacity performance.

WD Red Pro prices:
2 TB (model #: WD2001FFSX) is priced at Php 6,995
3 TB (model #: WD3001FFSX) is priced at Php 8,850
4 TB (model #: WD4001FFSX) is priced at Php 11,550

For bloggers on-the-go


For the on-the-go bloggers who wish to widen their video library, store clips for a long period of time and access these files conveniently everywhere, WD My Cloud and WD My Cloud EX2 are the right options.

WD My Cloud prices:
4 TB at Php 11, 490
3 TB at Php 8, 990
2 TB at Php 7, 490

WD My Cloud EX2 prices:
4 TB ranges from Php 17, 990
6 TB ranges from Php 22,990
8 TB ranges from Php 28,990
                   
As the revolutionary world of media and online world continue to grow, WD is always prepared to shift its gears to give the best storage solution that every enthusiast can ever have.


It's amazing to know that WD doesn't want to be left behind in the storage scene specially that people's needs are ever so changing! I admire the work they put into providing different types of products for the different types of people. As a blogger I, personally have always been curious about the WD My Cloud as it actually allows us to have our own cloud storage where we can access our files remotely! Talk about awesome! 

3 important things I learned at DPOP Professional Blogging Summit 2014

i was really fortunate to have scored an invite to the recently concluded Professional Blogging Summit organized by Janette Toral and Jeoff Solas. It happened last October 18, 2014 at A.Venue Mall, Makati and was co-presented by A.Venue Mall, Salad Box, Island Rose, and Profriends (Property Company of Friends).

the half-day event targeted bloggers, social media specialists, entrepreneurs, digital marketers, etc. so they could learn and discuss how to turn blogging into a sustainable profession.

i was really excited to attend the event, it's my dream to become a professional blogger. it's the only item in my passion list i'm willing to do full time because it excites me a lot!

i came with my friend and former colleague tina and we came in late because we were so lost! coming all the way from the north, we didn't expect the EDSA traffic (srsly, who doesn't expect EDSA traffic?! our bad!) so we had to find a different route. with the help of waze (our new found love), and some guts too, we were able to navigate through the downtowns and reached makati after one and a half hour! when we were finally near, we were literally flailing over the sight of makati city hall like "OMG!!! there's the city hall! we're almost there!" (but nonetheless still late).

New blogger friends! Leo, Donna, Dianne, Me, Tina, Shane, and Vic :)

anyway... here are my takeaways from the event. i learned a lot, made friends, and realized that the summit didn't only cover blogging per se, but its entire impact in the business industry as well.

1. do not build contacts, build relationships
this is how i see a "contact": 

for a good while i only considered the people i worked with as contacts. people i interact with everyday in a professional manner should be segregated from my so called friends. i simply didn't want anyone from my workplace to meddle into my personal life, if that's what having a relationship with them meant.

and i was wrong. 

if i was to do blogging as a profession and kept everyone i worked with as a blogger in this category called "Contacts", sure that's kindof valid... after all, they're contacts naman talaga. but then they'll be forever boxed with my concept of a contact which is: just someone i know... with a number on my phone.

listening to the speakers i was reminded that in order to really succeed in what you're doing, you have to build relationships. and that meant getting to know the person deeper, not just as a blogger but as a person as well.

it's kindof challenging if you ask me cos i'm not really a friendly person, but since i'm running a personal blog... i want to be as personal as possible to everything i've accounted here so far, even the brands i promote, and the people i work with. it's really haaard. HAHA but i'm positive about it! >XD

here's to making relationships!

so... how are you? (err, that was an awkward start)

2. avoid bashing online
and this applies not just to people or celebrities, but also to bad service we get from some establishments. we read a lot of this online, from a worm in one's soup, to a cockroach poop in someone glass of iced tea, yadda, yadda, yadda. 

i must admit, i have a short temper and i get easily pissed with bad service. when i'm greeted with something displeasing from a store i patronize, i just want to take pictures all over in a manner that will tell everyone looking that "this is going online. beware." 

as blogger, i was made to realize that we have great power (yeahh, no matter how small-time you think your blog is!). and you know what's next, responsibility! haha! >XD how do you want your power to be used? do you want it to close down businesses? or to help them improve? instead of ranting online, why not take that feedback form and write down your concern? talk to the manager, and discuss things over. don't make a public spectacle of someone's mistake. businesses are run by humans too, so let's be kind and responsible as bloggers. :)

3. the beauty of social media strategies and target marketing
apparently, not just because you have a large facebook following means you'll get instantly considered to promote this and that brand. it's not that simple. if you were the social media strategist of that brand, you'll have to consider your target market, where they lurk most at online (it's not always facebook, i tell you!), and what they do. then build from there. if you were targeting kids, would you always want to lead them to a blog or a website with lots of text? or would you want to contain them to just a photo on your facebook page with all the information laid out in a creative manner?

i'm not a marketing person so the technicalities involved with brand promotion is something that amazes me a lot. apparently it's not as simple as having a fashion blogger promote your store, and waiting for the horde of customers to come in. haha

this business is crazy and exciting at the same time! 

---

that's it for me! it was one very informative day! imagine if we came in earlier! aaargh! it only fueled up my passion for blogging more! grabe, someday talaga i'm going to turn this into my 9-5! hahaha! i'm glad that i was able to meet new blogger friends too! :D i came in inspired and came out more motivated than ever!

so...let's start with my ever growing backlog. hahaha

Coming up! Professional Blogging Summit

hey goys! i've been out and about this weekend and i can't wait to rant and rave about yesterday! haha for now let me plug you in with another exciting event:


Professional Blogging Summit will happen this coming Saturday (oct 18) at A.Venue, Makati.
it's a half day event that aims to gather bloggers, social media specialists, entrepreneurs, etc. in an insightful afternoon filled with discussions about making blogging a sustainable profession.

i've read the agenda and i'm so excited to learn about all the topics outlined! i may not be a professional blogger yet, but it's already in my bucket list! it's the very reason i signed up for this, i want to learn as much as i can so i can further equip myself in what i consider a dream job for myself! >XD


head on over to their website for more details

JOINING IS SIMPLE... AND FREE!
Just visit their website and fill out the form found at the bottom of the page. By doing so you have to agree to the conditions mentioned there, otherwise, you can pay Php 500! but really, the conditions are simple and almost effortless if you're really interested in the summit. i can't wait to blog about it! >XD

See you there!

[UPDATED] I'm joining Blogapalooza 2014! and YOU SHOULD TOO!


Are you a blogger? Do you want to grow your network, discover new and exciting products from various businesses, meet fellow bloggers, and converge in a day full of fun, knowledge, and freebies? Then come and join this year's Blogapalooza!

Happening this September 20 October 11 at SM Aura Convention Halls 1&2, is the biggest business to blogger networking event that you wouldn't want to miss!

For more details, click here!
If you want to know what's in for bloggers, see this link!

AND if you want to join, just register your blog over here and wait for the updated list of invited blogs on their news section, OR just wait for their email! :)

it will be my first time to join this event, and quite frankly, i didn't think my site would get in! >XD i don't know what to expect, what the format would be like. is it going to be like an expo with lots of exhibitors and free samples? a job fair where you drop your blog deets and hop on to the next booth? will it be like Nuffnang's Blogopolis w/ awesome speakers and tons of freebies? I REALLY DON'T KNOW. hahaha that's why i'm so excited!

if you have joined the previous Blogapalooza's, please enlighten me! haha

ARE YOU JOINING TOO? SEE YOU THEN!!! >XD